'분류 전체보기'에 해당되는 글 167건

  1. 2010.01.27 Crossover 한글 1
  2. 2010.01.09 katty on osx
  3. 2010.01.09 Linking matlab dylib on xcode 1
  4. 2010.01.07 ODE on Xcode (Leopard) 3
  5. 2010.01.07 How to add library files into Xcode project 1
  6. 2010.01.05 PCA 잘 정리된곳
  7. 2010.01.05 믹서기
  8. 2010.01.05 PDA as USB drive
  9. 2009.12.31 NAO robot experiment
  10. 2009.12.28 Aquamacs color theme

Crossover 한글

OSX 2010. 1. 27. 14:45

1.CrossOver에 한글 폰트를 설치합니다.
데스크톱이나 패러럴즈, 혹은 부트캠프에 복사된 폰트 파일을 뽑아냅니다.
gulim.ttc(95, 98, 2000, XP 기본 폰트), malum.ttf(Vista, 7 기본폰트, 오피스 2007에 포함)
이 둘 중에 하나, 혹은 둘 다를 CrossOver로 복사합니다. 윤고딕, 다음체 같은 서드파티 폰트를 써도 큰 문제는 없습니다.
모든 버전의 윈도우즈에서 이 폰트 파일들의 위치는
C:/windows/Fonts
입니다.

이 파일들을 다음과 같은 위치에 복사합니다.

(OSX 설치 볼륨)/(사용자 이름)/라이브러리/Aplication Support/CrossOver/Bottles/(설정한 보틀 이름)/drive_c/windows/fonts

윈도우즈 폰트 폴더의 파일들을 죄다 갖다 복사해도 좋습니다.

2. 시스템 기본 폰트를 설정합니다.

(OSX 설치 볼륨)/(사용자 이름)/라이브러리/Aplication Support/CrossOver/Bottles/(설정한 보틀 이름)/system.reg
라고 하는 파일이 있습니다. 이 파일을 에디터 프로그램으로 열어서 다음과 같은 부분을 찾습니다.

[Software\\Microsoft\\Windows NT\\CurrentVersion\\FontLink\\SystemLink] 1246078588
"Microsoft Sans Serif"=str(7):"MSGOTHIC.TTC,MS UIUI Gothic\0ume-ui-gothic.ttf\0"
"MS UI Gothic"=str(7):"ume-ui-gothic.ttf\0"

문자열 검색어는 "MS UI Gothic"=str(7):로 하면 한 번에 찾을 수 있습니다. 이 부분에서 빨간 글씨로 된 부분의 폰트명을 한글 폰트로 바꾸어주면 됩니다. gulim.ttc(굴림체)나 malgun.ttf(맑은고딕)으로 바꾸어주면 되겠군요.


위 두가지 조치로 어지간한 한글 깨짐 현상은 거의 해결할 수 있습니다. 물론 그거로도 해결이 안 되는 것들이 가끔 있긴 한데... 이를테면 오피스 설치할때 같이 깔리는 닷넷 프레임워크 1.1 같은 것들..(...) 하지만 설치가 된 이후로 이 정도의 손질만으로도 사용에 거의 지장이 없지요. 보틀을 새로 만들때마다 저렇게 한글 설정은 따로 해 줘야 합니다.


3. 프로그램별로 다른 보틀(Bottle)을 사용합니다.

일 반 윈도우즈에서 하드에 이런저런 프로그램을 여러번 깔고 지우면 시스템 퍼포먼스가 느려지고 심한 경우엔 여러가지 에러가 생기지요. WINE 계열도 마찬가지인데 WINE은 그나마 프로그램 제거가 여의치 않은 경우가 굉장히 많습니다. 이런저런 설정을 바꿔주는 것도 큰일이고 말이지요. 위에서 이야기한 시스템 폰트가 깨지는 문제도 일반 윈도우즈에서는 제어판에서 손쉽게 해결할 수 있는 일입니다만 WINE은 저렇게 레지스트리를 직접 수정해 주어야 합니다.

그런고로 웹하드라던가 빵집 같은 작은 프로그램을 설치하고 지울 보틀을 하나 정도 만드는 것은 좋습니다만 오피스, 한글과 같은 OS에 건드리는 부분도 많고 한번 잘못되면 보틀의 폐기까지 각오해야 하는 큰 프로그램들은 서로 다른 보틀에 깔아주는 것이 좋습니다. 보틀을 폐기한다는 것은 하드를 포맷하는 것 만큼이나 뼈아픈 일이니까 말이지요..(....) 물론 실제로 그 만큼의 수고가 들어가는 것은 아닙니다만.

그 리고 새로운 보틀을 만들 때에는 XP Bottle로 할 것을 추천합니다. 98, 2000 보틀이야 지금 와서 쓸 일이 있을까 싶고 Vista보틀은 글쎄요. Vista 전용 프로그램이란 것이 과연 있을까 싶을 정도이니까요. 여러모로 XP Bottle이 가장 좋지요.

:

katty on osx

Machine Learning 2010. 1. 9. 14:59

컴파일 성공 with xcode


katty2.1.zip

:

Linking matlab dylib on xcode

OSX 2010. 1. 9. 14:58

* add "-leng -lmx" on "Other Linker Flags"

* add "/Applications/MATLAB_R2008a/extern/include" on "Header Search Paths"

* add "/Applications/MATLAB_R2008a/extern/bin/maci" on "Library Search Paths"

* add "install_name_tool -change /private/var/automount/mathworks/BLR/devel/bat/Amake/build/3p/install/51724/maci/hdf5/lib/libhdf5.0.dylib @loader_path/libhdf5.0.dylib libmat.dylib" on "Targets->{app_name}->Run Script"

cf) install_name_tool -change "old path" "new path" "target file"


:

ODE on Xcode (Leopard)

Machine Learning 2010. 1. 7. 14:24

0. Compile ode.11.1 according to the instruction in the 'readme' file

- If it doesn't copy libs and headers in /usr/local/** then;

-- copy libdrawstuff.a, libdrawstuff.la, libode.a, libode.la into /usr/local/lib

-- copy ode/*.h into /usr/local/include/ode

-- copy drawstuff/*.h into /usr/local/include/drawstuff

1. File->New Project->Command LIne Utility/C++ Tool
201001071355.jpg

2. Select folder and Name the project as you want

3. Create Group names "Frameworks" and add 3 Frameworks (AGL.Framework, Carbon.Framework and OpenGL.Framework)


201001071404.jpg

4. Drag 3 frameworks and drop them into Target->[yourProjectName]->Copy Files


201001071408.jpg

5. Copy contents of "demo_friction.cpp" (for example) and past it on the main.cpp file.


201001071411.jpg

6. Goto "project [yourProjectName] Info" -> "Build" Tap -> "Search Paths" section;

- add "/usr/local/include" on "Header Search Paths"

- add "/usr/local/lib" on "Library Search Paths"

7. Goto "project [yourProjectName] Info" -> "Build" Tap -> "Linking" section;

- add "-ldrawstuff -lode" on "Other Linker Flags"


201001071417.jpg

8. Copy "texturepath.h" and "textures" folder into your project directory

9. Compile and Run~!


katty2.0.zip

:

How to add library files into Xcode project

OSX 2010. 1. 7. 11:46

2 vote down

To link to a .a library like this in Xcode you need to:

  • Double-click on your target or application in Xcode to open the Info window

  • Switch to the "Build" tab

  • Add -lfftw3 to "Other Linker Flags" (under "Linking")

  • Add the path to your library to the "Library Search Paths" (under "Search Paths"). In your case this will be /usr/local/lib

We use FFTW (it's great by the way), this works for us!

Cheers,

Steve

:

PCA 잘 정리된곳

Machine Learning 2010. 1. 5. 16:49

Matt's Matlab Tutorial Source Code Page

This document contains a tutorial on Matlab with a principal components analysis for a set of face images as the theme.

I wrote this tutorial while a graduate student in the Artificial Intelligence Laboratory of the Computer Science and Engineering Department at the University of California, San Diego. Now it's here at CSIM-AIT. You might still be able to find the original here.

Creative Commons License This work is licensed under a Creative Commons Attribution 3.0 License. You are free to use the code here for any purpose you like, but please acknowledge its source if you do. It's not required, but if you make improvements I'd appreciate it if you sent me your updates.

Here's an index to this tutorial:

Get some face images

I used the Ekman and Friesen Pictures of Facial Affect (POFA) for this tutorial. Unfortunately, the faces are copyrighted so if you want them you'll have to pay Paul Ekman some cash to get our online version of the database. Contact Gary Cottrell for details about our versions, or see http://www.paulekman.com/researchproducts.html on getting a CD directly from Ekman.

Don't despair, however. There are a bunch of nice face databases that are free. Check the Face Recognition Home Page for a list of what's available.

What is PCA and the “Eigenface” Technique?

I won't go into it in detail here, but the idea is that face images can be economically represented by their projection onto a small number of basis images that are derived by finding the most significant eigenvectors of the pixelwise covariance matrix for a set of training images. A quick Google Search shows that a lot of people like to play with this technique. In my tutorial I simply show how to get some eigenfaces and play with them in Matlab.

Other preliminaries

If you don't use emacs, the Matlab emacs mode may be one reason to use it. To get Matlab mode working in emacs, put matlab.el somewhere emacs can find it and add something like the following to your .emacs file:

(autoload 'matlab-mode "matlab" "Enter Matlab mode." t)
(setq auto-mode-alist (cons '("\\.m$" . matlab-mode) auto-mode-alist))
(defun my-matlab-mode-hook ()
  (setq matlab-indent-function t)       ; if you want function bodies indented
  (setq fill-column 76)         ; where auto-fill should wrap
  (matlab-mode-hilit)
  (turn-on-auto-fill))
(setq matlab-mode-hook 'my-matlab-mode-hook)
(autoload 'matlab-shell "matlab" "Interactive Matlab mode." t)
(defun my-matlab-shell-mode-hook ()
  '())
(setq matlab-mode-hook 'my-matlab-mode-hook)
I don't pretend to understand any of this emacs stuff. For more information, you might try the Mathworks Matlab Central Contrib site.

Reading and displaying images

Matlab can read PNG files and other formats without help. Here is how to read a PNG image into memory and look at the pixel values in its upper left corner. The ">>" is the Matlab prompt. Comments begin with a % sign.
>> help imread                    % Online help is useful...

 IMREAD Read image from graphics file.
    A = IMREAD(FILENAME,FMT) reads the image in FILENAME into
    A. If the file contains a grayscale intensity image, A is
    a two-dimensional array.  If the file contains a truecolor

    etc...

>> I = imread('test.png');        % Read image test.png into variable I
>> size(I)                        % Get the number of rows and columns of I

ans =

   320   240

>> I(1:10,1:10)                   % Display row 1-10 and col 1-10 of I

ans =

    26    20    20    22    22    20    19    20    22    22
    26    24    19    22    22    19    21    24    24    22
    25    24    22    24    21    19    20    22    24    22
    25    21    21    24    22    20    21    22    24    20
    24    20    22    25    22    19    20    21    25    24
    20    19    22    22    24    21    21    24    22    24
    20    20    21    25    25    24    24    25    20    20
    20    20    21    24    26    25    25    25    20    20
    20    19    22    24    24    25    24    24    22    21
    21    17    21    25    21    22    24    25    22    21

>> colormap(gray(256));          % Use a 256-value grayscale color map
>> image(I);                     % Display I as an image
>> daspect([1 1 1]);             % Set x:y aspect ratio to be 1:1

If you like the PGM format like I do, here are matlab functions for reading and writing them:

Getting your training set into one big matrix

Matlab is really nice for linear algebra stuff and visualization, but sorta sucks when it comes to file I/O. Or rather, it's not much easier than C, although there are functions for reading and writing entire arrays to and from files. The following function, defined in load_images.m, is an example of how to read a bunch of images, make column vectors out of each of them, and return the result.

function [Images,w,h] = load_images(filelist,downscale_f)
%LOAD_IMAGES Load a set of images listed in a file.
%
%            [IMGS,W,H] = LOAD_IMAGES(FILELIST) Treat each line of
%            the file named FILELIST as the filename of a PGM image,
%            and load each image as one column of the return array
%            IMGS.
%
%            LOAD_IMAGES(FILELIST,DOWNSCALE_F) Do the same thing,
%            but downscale each image's width and height by a factor
%            of DOWNSCALE_F.  Useful if the images are too big to be
%            loaded into memory all at once.

% Matthew Dailey 2000
  
  % Check argument consistency

  if nargin < 1 | nargin > 2
    error('usage: load_images(filelist[,downscale_f]');
  end;
  if nargin == 1
    downscale_f = 1.0;
  end;
  Images = []; old_w = 0; old_h = 0; w=0; h=0;

  % Open input file

  numimgs = linecount(filelist);
  fid = fopen(filelist,'r');
  if fid < 0 | numimgs < 1
    error(['Cannot get list of images from file "' filelist, '"']);
  end;

  % Get the images

  for i = 1:numimgs
    imgname = fgetl(fid);
    if ~isstr(imgname)            % EOF is not a string
      break;                      % Exit from loop on EOF
    end;
    fprintf(1,'loading PGM file %s\n',imgname);
    Img = readpgm(imgname);       % Read this image as a 2D array
    if i==1                       % If this is first image, figure things out
      old_w = size(Img,2);        %   - like sizes of the downscaled images
      old_h = size(Img,1);
      if downscale_f <= 1.0
        w = old_w; h = old_h;
      else
        w = round(old_w/downscale_f); h = round(old_h/downscale_f);
      end;
      Images = zeros(w*h,numimgs);   % - preallocate size of the return matrix
    end;
    if downscale_f > 1.0
      Img = im_resize(Img,w,h);      % downscale using bicubic spline interp
    end;
    Images(1:w*h,i) = reshape(Img',w*h,1);   % Make a column vector
  end;
  fclose(fid);                    % Close the filelist when done

  fprintf(1,'Read %d images.\n',numimgs);

  % The function returns the output arguments Images, w, and h here.
The function has a downscaling factor that lets you save memory. To use the function, just create a file listing your images then run:
>> [Imgs,w,h] = load_images('facelist',4);
The im_resize function uses Matlab's built in 2-D function interpolation (using bicubic splines) to resize the image by the desired downscaling factor. If you want to run load_images, you also need the trivial little function linecount.

Here is how you would convert a column of Imgs back into an image and display it:

>> L = Imgs(:,10);
>> L = reshape(L,w,h)';         % Reshapes column vector into a 2D array
>> image(L);
>> colormap(gray(256));
>> daspect([1 1 1]);

Getting the principal component eigenvectors of the training set

The function pc_evectors uses Turk and Pentland's trick to get the eigenvectors of A*A' from the eigenvectors of A'*A. It uses the function sortem to sort the eigenvectors and eigenvalues by eigenvalue. [Here is a faster version, sortem2, by James Javurek-Humig, which is considerably faster, if you have matlab version 7 or better.] To use pc_evectors, just do:

>> [Vecs,Vals,Psi] = pc_evectors(Imgs,30);   % Get top 30 PC evectors of Imgs
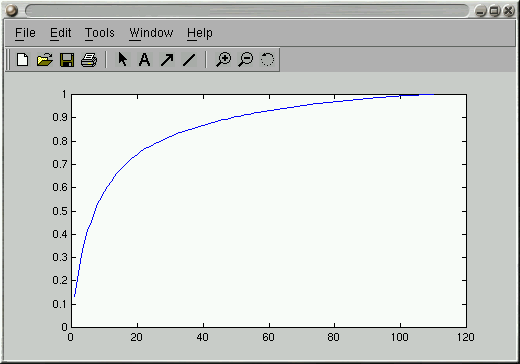
And to explore the eigenvalue spectrum and how much variance the first n vectors account for, try the following:
>> plot(Vals);                       % To plot the eigenvalues
>> CVals = zeros(1,length(Vals));    % Allocate a vector same length as Vals
>> CVals(1) = Vals(1);
>> for i = 2:length(Vals)            % Accumulate the eigenvalue sum
     CVals(i) = CVals(i-1) + Vals(i);
   end;
>> CVals = CVals / sum(Vals);        % Normalize total sum to 1.0
>> plot(CVals);                      % Plot the cumulative sum
>> ylim([0 1]);                      % Set Y-axis limits to be 0-1
This gives you something like the following:

It depends on the application, but most folks seem to use a number of eigenvectors that account for variance somewhere in the 65%-90% range.

Exploratory analysis of the eigenvectors

One thing that can be fun is to try to figure out what the top few eigenvectors encode. You can make a scatter plot of one component against another as follows:

>> Proj = Vecs(:,1:2)' * Imgs;       % Project each image onto first 2 evectors
>> size(Proj)

ans =

     2   110

>> plot(Proj(1,:),Proj(2,:),'r.')    % To get scatterplot of PC 1 vs PC 2

And if you wanted to add text labels to each of the points in the plot, you could do the following. First create a file containing the labels you want, in the correct order. Then read it into a Matlab string array:
>> Labels = textread('labels','%s');    % Read labels from file 'labels'
>> text(Proj(1,:),Proj(2,:),Labels);    % Add text labels at each plotted point

It is simple to display an eigenface as an image, using the built in imagesc function, which first scales the values in an array to the 0-255 range.
>> pc_ev_1 = Vecs(:,1);                 % Get PC eigenvector 1
>> pc_ev_1 = reshape(pc_ev_1,w,h)';     % Reshape into 2D array
>> imagesc(pc_ev_1);                    % Display as image scaled 0-255

Finally, you might be interested in determining the reconstruction error involved in representing an image by its projection onto a few eigenvectors. Here is how you would project onto and reconstruct from eigenvectors 1-10.
>> OrigImg = Imgs(:,20);                     % Grab image 20
>> Projection = Vecs(:,1:10)'*(OrigImg - Psi);    % Project onto ev's 1-10
>> Reconstruction = Vecs(:,1:10)*Projection+Psi;  % Reconstruct from projection
>> Reconstruction = reshape(Reconstruction,w,h)';
>> image(Reconstruction);
>> colormap(gray(256));
>> daspect([1 1 1]);

References


mdailey@ait.ac.th
http://www.cs.ait.ac.th/~mdailey
Last Updated: 01/05/2010 10:46:39
:

믹서기

Etc 2010. 1. 5. 16:46
한일전기 HM-1270HIT

확대

상품찜하기 최저가 알리미 리뷰 쓰기 이전목록보기

:

PDA as USB drive

Etc 2010. 1. 5. 16:45

전 PDA를 사용합니다.


사실 PDA가 아니라 핸드폰입니다.

일명 PDA폰이죠.

모델명은 SCH-M495, 다들 옴니아로 부릅니다.

PDA폰의 장점이라면, 역시 다양한 프로그램을 사용자 입맛에 맞게 설치하여 사용할 수 있다는거죠.

그래서 시작한 "쓸만한 PDA용 프로그램" 첫번째.


WM5torage 1.9

WM5torage_19.CAB


두둥!

PDA에 파일을 옴길때 SD카드를 빼거나 겁나 느린 액티브싱크를 사용하지 않고,

PDA를 USB 외장 메모리로 인식하게 해주는 고마운 프로그램입니다.

옴니아 자체 USB 모드는 써봐야 전화불능 상태로 바뀌기 때문에 쓰기가 좀 거시기하고...

이 프로그램을 쓰면 매우 편하답니다.

물론 무료 소프트웨어이고 간단합니다.

일단 PDA 싱크 시키시고, 파일 다운받아서 설치합니다.


파일 스토리지를 직접 컨트롤 하는 프로그램인 만큼 장치에 직접 설치하는 것을 강력하게 권장합니다.


설치가 끝나면 재부팅을 하라고 꼬십니다.

확실한 설치를 위하여 눈물을 머금고 리부팅을 합니다.


재부팅이 끝나면, 프로그램 목록에 WM5torage가 보입니다.

묻지도 않고 따지지도 않고 실행해봅시다.


프로그램이 실행되고 간단한 설정이 뜹니다.

DSK: / SD Memory Card 써져있는 곳을 누르면 현재 PDA상의 스토리지 목록이 나옵니다.

저는 외장 메모리를 USB 모드로 하기위해 SD카드를 선택했습니다.

오른쪽 위에 Two-Way 모드는 1.9 버전에 생긴건데, 뭐하는 옵션인지 모르겠습니다.

사실 스토리지 선택하는거 말고는 딱히 건들 옵션은 없습니다.

중요한건 현재 장치 즉, 윈도우 설치 드라이브는 선택하면 안됩니다.

PDA가 바보가 되어버립니다.

실수로 윈도우 설치 폴더를 선택하시고 Activate를 누르셨다면, 과감히 재부팅!

어째꺼나 설정이 끝나면 왼쪽 아래 소프트키인 Activate를 눌러줍니다.


짜잔~~!

네. 사실 별로 딱히 바뀐건 아니죠.

Activate가 Deactivate로 바뀌고 옵션 설정 화면이 잠금상태가 되며,

PDA에서 해당 스토리지가 사라집니다.

이상태에서 PDA를 컴퓨터로 연결하면,


컴퓨터에 익숙한 화면이 뜹니다.

아무거나 필요하신 명령을 선택하고 확인 누르시거나,

저처럼 귀찮아서 취소누릅니다.


그리고 컴퓨터에서 탐색기를 열면 SCH-M495 / Stroage Card (H:) 라고 외부 드라이브로 인식한 화면이 나옵니다.

이제 USB 메모리에 파일 옴기듯이 편하게 파일을 옴기시고,

작업이 끝나면, PDA에서 Deactivate 눌러줍니다.

아까 Activate가 있던 자리죠 (왼쪽 맨 아래 소프트키)

그러면 USB 모드가 풀리면서 PDA에서 해당 스토리지가 다시 보입니다.


으흠.. 내용이 부실한건 절대 귀찮아서 그런게 아닙니다.

네. 그렇습니다. 절대 귀찮지 않습......

간단한 프로그램이서 그런겁니다!!!

그럼.. 이만.. ;;;;
:

NAO robot experiment

Machine Learning 2009. 12. 31. 19:50

* Wifi configuration

- Turn on the robot with network cable connected.

-- the network cable should be connected with a router which the user computer connects to.

- Get IP by pushing the Nao's chest button

- http://robotip

- config wifi with WPA encryption

* How to register user programmed modules

- consol (1)

-- ./mymodulename -pip robotIP

-- (example) - ./getandset -pip 192.168.0.16

- consol (2)

-- python modulerunner.py

--- modify IP address (If robotIP is 192.168.0.16)

----broker = ALBroker("pythonBroker","192.168.0.16",9559,"192.168.0.16",9559)

-- (example) python run.py

:

Aquamacs color theme

OSX 2009. 12. 28. 19:44

컬러테마는 http://download.gna.org/color-theme/ 요 기가서 받은후에 압축을 풀면 파일들이 몇개 생긴다. 그중에서 color-theme-autoloads.el 은 /etc/emacs/site-start.d/60color-theme-autoloads.el 과 같은 형식으로 복사 해주고 color-theme.el이랑 themes디렉토리는 /usr/share/emacs22/site-lisp/ 에 몽짱 넣어주면 된당.

그런 다음

Start Aquamacs; M-x color-theme-select; Pick the color theme that you want to use.


다필요없고

vi ~/.emacs

한 후

(require 'color-theme)
(color-theme-initialize)
(color-theme-midnight)
넣고 저장


: